
Back to library
Finishing & ShootingReceiving & First TouchPassing & Combination PlayAdvancedIntermediateFocused Drill
T-Zone Drop Pass & Finishing Circuit
10-15 minutes Group 6 cones, 4+ soccer balls, 1 full-size goal
Listen to your Coach
Coach Carter
A short spoken walk-through of this drill.
Goal
Score with a first-time strike following a clean, weighted layoff from the wing player.
Setup
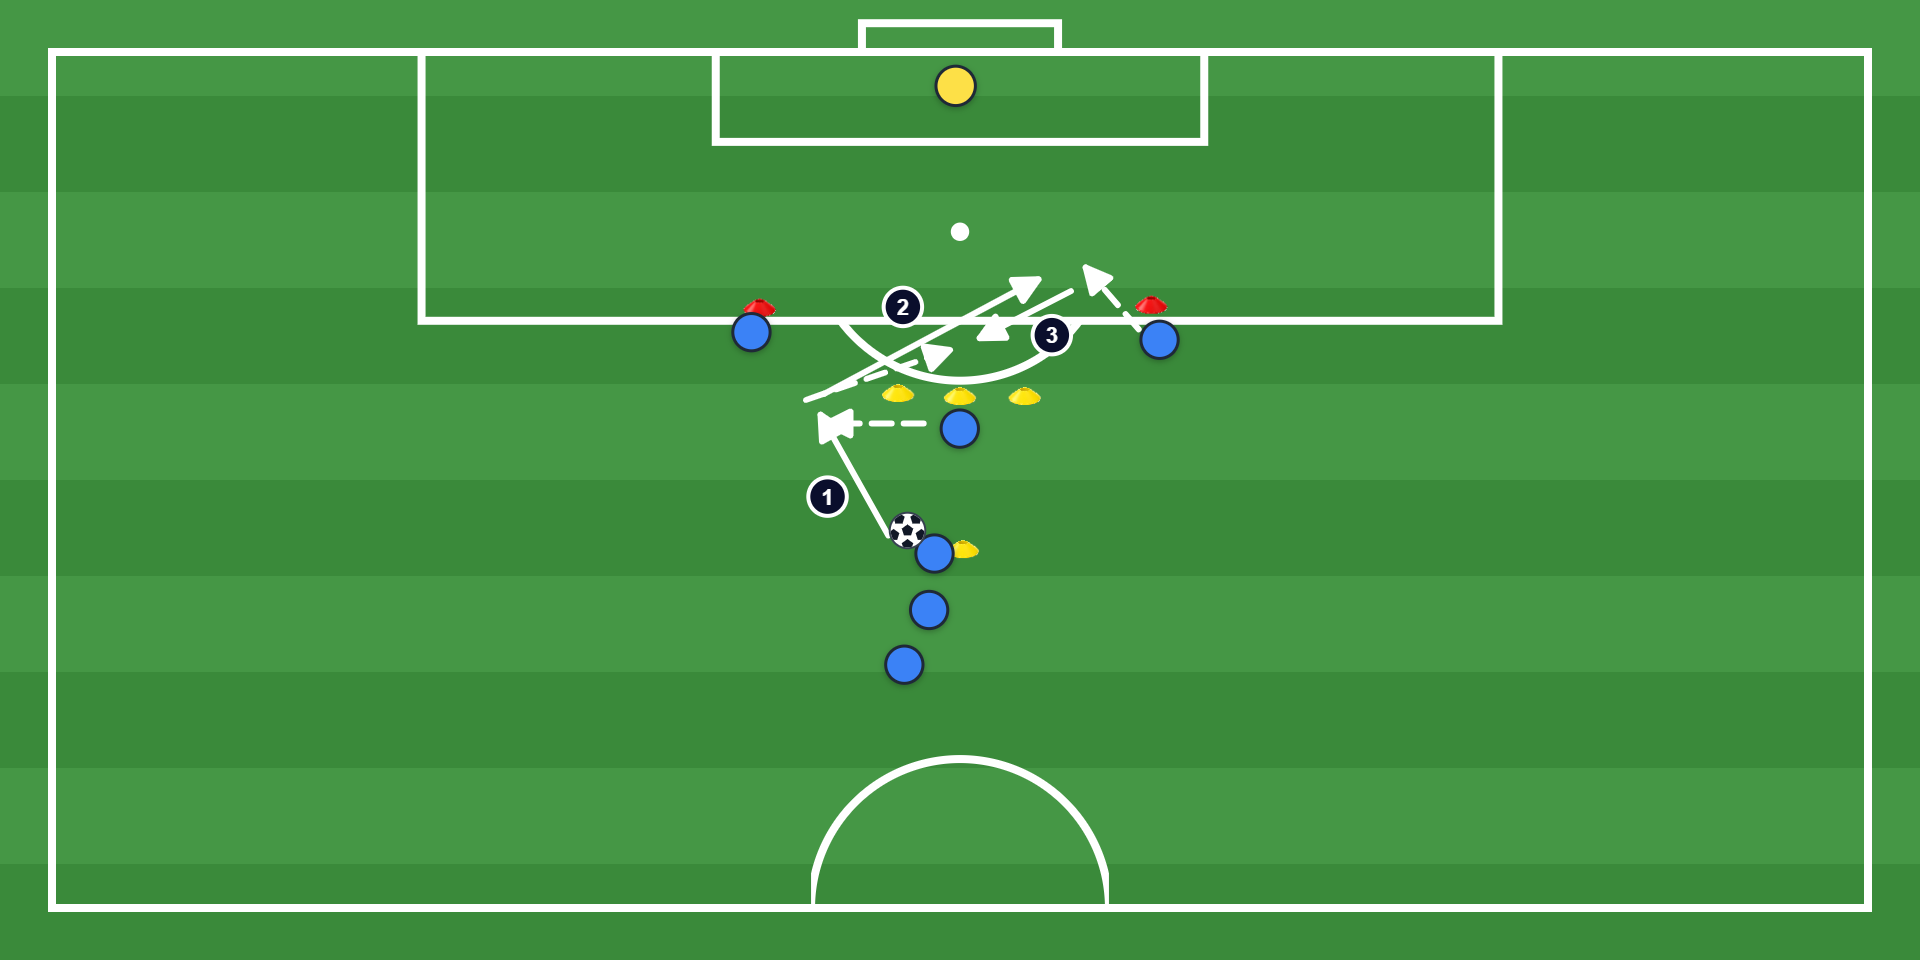
Place 3 cones in a line at the top of the 'D' (3 yards apart). Place cones C and D at 45-degree angles on the 18-yard box line. Place cone A 5 yards back to form a 'T'.
Drill Instructions
1. Player B starts at the middle cone and opens up outside one of the end cones. 2. Player A passes from the base of the T to Player B. 2. Player B scans, opens their body, and plays a 1-touch pass across the D to Player C. 3. Player C plays a 1-touch drop pass back into the path of B. 4. Player B shoots first-time. 5. Repeat the sequence using wing player D on the opposite side.
Coach Tip
Keep your head over the ball during the strike to ensure the shot stays low and on target.
Avoid
Avoid standing flat-footed when waiting for the drop pass; keep feet moving to adjust to the ball's speed.
Adjust on the fly
Make it easier
Allow Player B to take one touch to settle the ball before shooting.
Make it harder
Add a recovering defender who tries to block the shot once Player C touches the ball.
Ready to train?
Add this drill to your Active Drills to start tracking time and progress.
AI Coach feedback
Upload or record a clip of yourself on this drill and your AI coach will spot what's working and what to fix next.
Setup
Place 3 cones in a line at the top of the 'D' (3 yards apart). Place cones C and D at 45-degree angles on the 18-yard box line. Place cone A 5 yards back to form a 'T'.
Drill Instructions
1. Player B starts at the middle cone and opens up outside one of the end cones. 2. Player A passes from the base of the T to Player B. 2. Player B scans, opens their body, and plays a 1-touch pass across the D to Player C. 3. Player C plays a 1-touch drop pass back into the path of B. 4. Player B shoots first-time. 5. Repeat the sequence using wing player D on the opposite side.
Goal
Score with a first-time strike following a clean, weighted layoff from the wing player.
Coach Tip
Keep your head over the ball during the strike to ensure the shot stays low and on target.
Avoid
Avoid standing flat-footed when waiting for the drop pass; keep feet moving to adjust to the ball's speed.
Adjust on the fly
Make it easier
Allow Player B to take one touch to settle the ball before shooting.
Make it harder
Add a recovering defender who tries to block the shot once Player C touches the ball.
Watch the Drill
Video coming soon.
QR
coming
soon
coming
soon
Listen to your Coach
Coach Carter
A short spoken walk-through of this drill.
Ready to train?
Add this drill to your Active Drills to start tracking time and progress.
AI Coach feedback
Upload or record a clip of yourself on this drill and your AI coach will spot what's working and what to fix next.